[SpringBoot] Jwt token을 사용해보자. (실습포함)
- 클라이언트가 서버에 접속을 하면 서버는 해당 클라이언트에게 인증되었다는 의미로 유일한 '토큰'을 보내준다.
- 이후 클라이언트가 서버에 요청을 보낼때 요청 헤더에 토큰을 심어서 보낸다.
- 서버에서는 클라이언트로부터 받은 토큰을 서버에서 제공한 토큰과 맞는지 일치여부를 체크하여 인증을 처리한다.
- Token방식은 Payload자체는 암호화가 되지않으므로,중요정보는 담지않는다.
1) 사용자가 로그인
2) 서버->클라이언트 토큰발급
3) 클라이언트는 토큰을 쿠키나 스토리지에 저장
4) 서버에 요청시 헤더에 같이 전송
5) 서버는 검증후 요청 응답
Jwt token을 사용해보자. (실습)

간단한 실습을 해보려한다. 일단 실습을 위해 짠 기본적 파일 구조는 위와 같다.
JwtService에는 Jwt 생성,Jwt parsing기능을 담고 JwtUserService에는 User와 관련한 Jwt Service들을 담아줄 것이다.
● 실습 준비
- build.gradle에 해당 dependency 추가
implementation 'io.jsonwebtoken:jjwt-api:0.11.2'
implementation 'io.jsonwebtoken:jjwt-impl:0.11.2'
implementation 'io.jsonwebtoken:jjwt-jackson:0.11.2'
- SHA256은 암호화 해싱에 쓰이는 파일이다.
// SHA256.java

public class SHA256 {
    public SHA256() {
    }

    public static String encrypt(String planText) {
        try {
            MessageDigest md = MessageDigest.getInstance("SHA-256");
            md.update(planText.getBytes());
            byte[] byteData = md.digest();
            StringBuffer sb = new StringBuffer();

            for(int i = 0; i < byteData.length; ++i) {
                sb.append(Integer.toString((byteData[i] & 255) + 256, 16).substring(1));
            }

            StringBuffer hexString = new StringBuffer();

            for(int i = 0; i < byteData.length; ++i) {
                String hex = Integer.toHexString(255 & byteData[i]);
                if (hex.length() == 1) {
                    hexString.append('0');
                }

                hexString.append(hex);
            }

            return hexString.toString();
        } catch (Exception var7) {
            var7.printStackTrace();
            throw new RuntimeException();
        }
    }
}
- 다음으로는 구현에 필요한 Dto들이다.
- 먼저 기본 유저 모델은 JwtUser이다.
- Login Request를 할때는 email,password가 필요하고 Login Response를 할때는 userIdx,Jwt token을 응답해준다.
@Data
@AllArgsConstructor
@RequiredArgsConstructor
@Entity
public class JwtUser {

    @Id
    @GeneratedValue(strategy = GenerationType.IDENTITY)
    private int userIdx;


    private String email;
    private String password;

    @UpdateTimestamp
    private Timestamp loginDate;

}
@Getter
@Setter
@NoArgsConstructor
@AllArgsConstructor
public class PostLoginReq {
private String email;
private String password;
}@Getter
@Setter
@NoArgsConstructor
@AllArgsConstructor
public class PostLoginRes {
private int userIdx;
private String jwt;
}- 본 실습은 편의를 위해 Jpa Repo를 사용하도록하겠다.
public interface UserDao extends JpaRepository<JwtUser,Integer> {
    // ※ JPA Query Method
    // findBy 규칙 , Username 문법
    // select * from user where username = ?
    JwtUser findByUserIdx(int idx);

    JwtUser findByEmail(String email);
}
- 핵심이 되는 JwtService파일이다.
- jwt 토큰생성, 정보추출, getJwt등의 토큰 관련 주요기능을 담고있다.
@Service
public class JwtService {
    @Autowired
    private static UserDao userDao;

    String apikey = "jwtsigntutorialasdfasdfasdfasdfasdf";

    private Key getSignKey(){
        return Keys.hmacShaKeyFor(apikey.getBytes(StandardCharsets.UTF_8));
    }

    public String createJwt(int userIdx){

        Date now = new Date();
        return Jwts.builder()
                .setHeaderParam("type","jwt")
                .claim("userIdx",userIdx)
                .setIssuedAt(now)
                .setExpiration(new Date(System.currentTimeMillis()+1*(1000*60*60*24*365)))
                .signWith(getSignKey())
                .compact();
    }

    /*
    Header에서 X-ACCESS-TOKEN 으로 JWT 추출
    @return String
     */
    public String getJwt(){
        HttpServletRequest request = ((ServletRequestAttributes)RequestContextHolder.
        currentRequestAttributes()).getRequest();
        return request.getHeader("X-ACCESS-TOKEN");
    }

    /*
    JWT에서 userIdx 추출
    @return int
    @throws BaseException
     */
    public int getUserIdx() throws BaseException {
        //1. JWT 추출
        String accessToken = getJwt();

        if(accessToken == null || accessToken.length() == 0){
            throw new BaseException(EMPTY_JWT);
        }

        // 2. JWT parsing
        Jws<Claims> claims;
        try{
            claims = Jwts.parserBuilder()
                    .setSigningKey(getSignKey())
                    .build()
                    .parseClaimsJws(accessToken);

        } catch (Exception ignored) {
            throw new BaseException(INVALID_JWT);
        }
        // 3. userIdx 추출
        return claims.getBody().get("userIdx",Integer.class);
    }
}
● Jwt token user 생성 실습
-결과 미리보기


- 유저 생성 요청을보내면, 요청 성공시 해당 유저의 idx와 jwt토큰을 응답받는 로직을 구현해보자.
// JwtController.java
@RequiredArgsConstructor
@RestController
@RequestMapping("/jwt")
public class JwtController {

    @Autowired
    private final UserDao userDao;

    @Autowired
    private final JwtUserService jwtUserService;

    @Autowired
    private final JwtService jwtService;

    /**
     * 회원가입 API
     * [POST] /users
     */
    // Body
    @ResponseBody
    @PostMapping("/join")
    public BaseResponse<PostLoginRes> createUser(@RequestBody JwtUser postUserReq) {
        // 요청 ; 아이디,비밀번호 => 반환 ; useridx,jwt토큰반환

        if(postUserReq.getEmail() == null){
            return new BaseResponse<>(POST_USERS_EMPTY_EMAIL);
        }
        //이메일 정규표현
        if(!isRegexEmail(postUserReq.getEmail())){
            return new BaseResponse<>(POST_USERS_INVALID_EMAIL);
        }
        try{
            PostLoginRes jwtUser = jwtUserService.createUser(postUserReq);
            return new BaseResponse<>(jwtUser);
        } catch(BaseException exception){
            return new BaseResponse<>((exception.getStatus()));
        }
    }
    ...
- 서비스단에서는 비밀번호를 암호화 해서 유저정보를 저장한다.
// JwtUserService.java
@RequiredArgsConstructor
@Service
public class JwtUserService {

    @Autowired
    private UserDao userDao;

    @Autowired
    private JwtService jwtService;

    public PostLoginRes createUser(JwtUser postUserReq) throws BaseException {

        //이메일 중복체크

        String pwd;
        try{
            //암호화
            pwd = new SHA256().encrypt(postUserReq.getPassword());
            postUserReq.setPassword(pwd);

            System.out.println(postUserReq.getPassword());

        } catch (Exception ignored) {
            throw new BaseException(PASSWORD_ENCRYPTION_ERROR);
        }
        try{
            userDao.save(postUserReq);
            int userIdx = userDao.findByUserIdx(postUserReq.getUserIdx()).getUserIdx();

            //jwt 발급.
            String jwt = jwtService.createJwt(userIdx);
            return new PostLoginRes(userIdx,jwt);
        } catch (Exception exception) {
            throw new BaseException(DATABASE_ERROR);
        }
    }
}
● Jwt token user 로그인 실습
-결과 미리보기
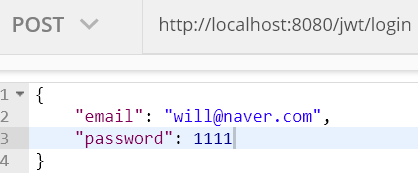

- 유저 로그인 요청을보내면, 요청 성공시 해당 유저의 idx와 jwt토큰을 응답받는 로직을 구현해보자.
- 이메일값에 해당하는 유저 정보를 불러와, 해당 유저의 암호화된 비밀번호와 로그인비밀번호가 일치하면 토큰 생성 후 돌려준다.
// JwtController.java
...
@PostMapping("/login")
public PostLoginRes logIn(@RequestBody PostLoginReq postLoginReq) throws BaseException {
    JwtUser user;
    String encryptPwd;

    if(checkEmail(postLoginReq.getEmail()) == 0){
        throw new BaseException(FAILED_TO_LOGIN);
    }

    // Password encode
    try {
        user = userDao.findByEmail(postLoginReq.getEmail());
        try {
            encryptPwd = new SHA256().encrypt(postLoginReq.getPassword());
        } catch (Exception exception) {
            throw new BaseException(FAILED_TO_LOGIN);
        }
    } catch (Exception exception) {
        throw new BaseException(DATABASE_ERROR);
    }

    // Password 일치하면 토큰 생성
    if(user.getPassword().equals(encryptPwd)){
        int userId = user.getUserIdx();
        String jwt = jwtService.createJwt(userId);
        return new PostLoginRes(userId,jwt);
    }
    else{
        throw new BaseException(FAILED_TO_LOGIN);
    }
}
● Jwt token 추가 활용 실습
-결과 미리보기

- 토큰을 활용한 추가 실습을 해보자.
- 주소의 userIdx가 Jwt token의 userIdx와 일치할때 유저정보를 반환해보자.
@ResponseBody
@GetMapping("/{userIdx}")
public BaseResponse<JwtUser> getUser(@PathVariable("userIdx") int userIdx) throws BaseException
{
    // JWT에서 userIdx 추출
    int userIdxByJwt = jwtService.getUserIdx();

    //접근유저와 userIdxByJwt가 같지않으면 에러
    if(userIdx != userIdxByJwt){
        return new BaseResponse<>(INVALID_JWT);
    }
    JwtUser jwtUser = userDao.findByUserIdx(userIdx);

    // Get User
    JwtUser getUserRes = userDao.findByUserIdx(userIdx);
    return new BaseResponse<>(getUserRes);

}