
| 일 | 월 | 화 | 수 | 목 | 금 | 토 |
|---|---|---|---|---|---|---|
| 1 | 2 | 3 | 4 | 5 | 6 | 7 |
| 8 | 9 | 10 | 11 | 12 | 13 | 14 |
| 15 | 16 | 17 | 18 | 19 | 20 | 21 |
| 22 | 23 | 24 | 25 | 26 | 27 | 28 |
| 29 | 30 |
- 출처 코딩셰프
- 서버에도커설치
- 스프링부트api
- 스프링익셉션처리
- 스프링부트팔로잉
- 스프링부트사진올리기
- 스프링부트서버에사진전송
- ssh도커설치
- 출처 문어박사
- 출처 메타코딩
- WAS웹서버
- 스프링부트
- springboot_exception_handler
- 인스타클론
- dockerinstall
- 출처 따배도
- 스프링구독
- 우분투도커설치
- 스프링부트중복예외처리
- 스프링사진업로드
- 출처 노마드코더
- 스프링이미지업로드
- 스프링부트팔로우취소
- vm도커설치하는법
- 스프링부트구독취소
- 멀티폼
- 도커설치하는법
- centos도커설치
- 파이썬sort
- 스프링사진
- Today
- Total
MakerHyeon
[Spring 기초] jUnit 개념과 Annotation 본문
● jUnit 의 특징
- 단정(assert) 메서드로 테스트 케이스의 수행 결과를 판별한다. ex_ assertEquals(예상 값, 실제 값)
- jUnit4부터는 테스트를 지원하는 어노테이션을 제공한다.
- 각 @Test 메서드가 호출할 때 마다 새로운 인스턴스를 생성하여 독립적인 테스트가 이루어지도록 한다.
@Test
- @Test가 선언된 메서드는 테스트를 수행하는 메소드가 된다.
- Junit은 테스트가 독립적으로 실행되며,@Test마다 객체를 생성함.
@Ignore
- @Ignore가 선언된 메서드는 테스트를 실행하지 않게 한다.
@Before
- @Before가 선언된 메서드는 @Test 메서드가 실행되기 전에 반드시 실행되어 진다.
- @Test메소드에서 공통으로 사용하는 코드를@Before 메소드에 선언
@After
- @After가 선언된 메서드는 @Test 메서드가 실행된 후 실행됨
@BeforeClass
- @Test 메서드보다 먼저 한번만 수행되어야 할 경우에 사용
@AfterClass
- @Test 메서드보다 나중에 한번만 수행되어야 할 경우에 사용

- @Before, @After는 Test 메서드가 호출될 때마다 같이 실행됨.
- @BeforeCalss,@AfterClass 는 클래스 로딩되는 시점이 딱 한번.
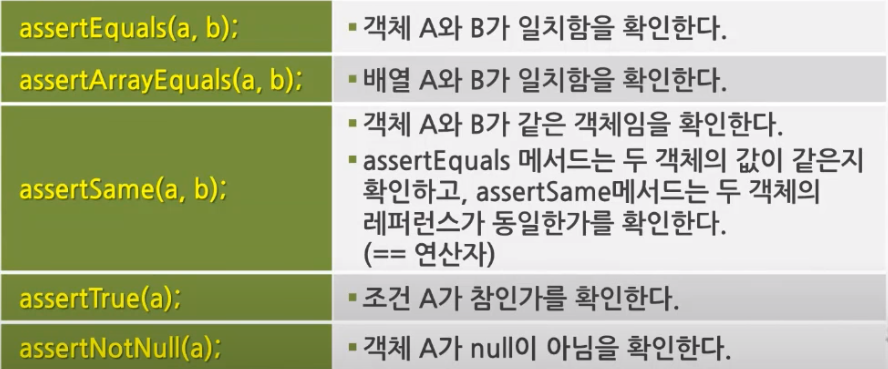
● test 결과 확인 단정(assert) 메서드
● JUnit DI 테스트 클래스
package myspring.di.xml.test;

import org.junit.Before;
import org.junit.Ignore;
import org.junit.Test;
import org.springframework.context.ApplicationContext;
import org.springframework.context.support.GenericXmlApplicationContext;


import myspring.di.xml.Hello;
import myspring.di.xml.Printer;
import static org.junit.Assert.*;

public class HelloBeanJunitTest {

    private ApplicationContext context;

    @Before
    public void init() {
        //IoC 컨테이너 생성
        //1.ApplicationContext 객체 생성
        context = new GenericXmlApplicationContext("config/beans.xml");
    }

    @Test
    public void test1(){

        //2. getBean() 호출
        Hello hello = (Hello) context.getBean("hello");

        //3. Hello 의 sayHello()호출.
        /*Assert.assertEquals("Hello Spring Study",hello.sayHellow());*/
        assertEquals("Hello Spring Study",hello.sayHellow());
        System.out.println(hello.sayHellow());
        //4. Hello 의 print() 호출
        hello.print();

        //5. SpringPrinter getBean() 호출
        Printer printer = context.getBean("printer",Printer.class);
        assertEquals("Hello Spring Study",printer.toString());
        System.out.println(printer.toString());
    }

    @Test
    public void test2(){

        Hello hello = (Hello) context.getBean("hello");

        Hello hello2 = (Hello) context.getBean("hello");

        assertSame(hello, hello2);
    }
}
● Spring-Test에서 테스트를 지원하는 어노테이션(Annotation)
@RunWith(SpringJUnit4ClassRunner.class)
- @RunWith는 JUnit 프레임워크의 테스트 실행방법을 확장할 때 사용하는 어노테이션이다.
- SpringJUnit4ClassRunner라는 클래스를 지정해주면 JUnit이 테스트를 진행하는 중에 ApplicationContext를 만들고 관리하는 작업을 진행해 준다.
- RunWith 어노테이션은 각각의 테스트 별로 객체가 생성되더라도 싱글톤(Singleton)의 ApplicationContext를 보장한다.
@ContextConfiguration
- 스프링 빈(Bean) 설정 파일의 위치를 지정할 때 사용되는 어노테이션이다.
@Autowired
- 스프링DI에서 사용되는 특별한 어노테이션이다.
- 해당 변수에 자동으로 빈(Bean)을 매핑 해준다.
- 스프링 빈(Bean) 설정 파일을 읽기 위해 굳이 GenericXmlApplicationContext를 사용할 필요가 없다.
● Spring-Test DI 테스트 클래스
package myspring.di.xml.test;

import org.junit.Ignore;
import org.junit.Test;
import org.junit.runner.RunWith;
import org.springframework.beans.factory.annotation.Autowired;
import org.springframework.context.ApplicationContext;
import org.springframework.test.context.ContextConfiguration;
import org.springframework.test.context.junit4.SpringJUnit4ClassRunner;

import myspring.di.xml.Hello;
import myspring.di.xml.Printer;
import static org.junit.Assert.*;

import java.util.List;

@RunWith(SpringJUnit4ClassRunner.class)
@ContextConfiguration(locations = "classpath:config/beans.xml")
public class HelloBeanJunitSpringTest {

    @Autowired
    private ApplicationContext context;

    @Test
    public void test1() {
        // 2. getBean() 호출
        Hello hello = (Hello) context.getBean("hello");

        // 3. Hello 의 sayHello()호출.
        /* Assert.assertEquals("Hello Spring Study",hello.sayHellow()); */
        assertEquals("Hello Spring Study", hello.sayHellow());
        // 4. Hello 의 print() 호출
        hello.print();

        // 5. SpringPrinter getBean() 호출
        Printer printer = context.getBean("printer", Printer.class);
        assertEquals("Hello Spring Study", printer.toString());

    }

    @Test
    public void test2() {

        Hello hello = (Hello) context.getBean("hello");

        Hello hello1 = (Hello) context.getBean("hello");

        assertSame(hello, hello1);
    }

    @Test
    @Ignore
    public void test3() {
        Hello hello = context.getBean("hello3",Hello.class);
        List<String> list = hello.getNames();
        for (String value: list) {
            System.out.println(value);
        }

    }
}
'SpringBoot' 카테고리의 다른 글
| [Spring 기초] DI Application (0) | 2023.05.10 |
|---|---|
| [SpringBoot] URI를 이용한 REST API Version 관리 (0) | 2023.03.05 |
| [SpringBoot] 프로그래밍으로 제어하는 Filtering 방법 - 사용자 조회 (0) | 2023.03.05 |
| [instagramProject] 인스타 팔로우 / 좋아요 기능 구현 (0) | 2023.03.05 |
| [SpringBoot] Response데이터 제어 Filtering (@JsonIgnore) (0) | 2023.03.03 |
